![]()
Owners of the Moto G 2015 (osprey) can now acquire and run Android 8.1 through Pixel Experiences. If you have been running a Stock Rom so far it may worth taking a look at this, one of the most popular ROMS available. This build is based off pure AOSP, and works surprisingly well. Known issues on the rom include crashes during video recording.
The Moto G 2015 is one of the most beloved Motorola Android smartphones and there are multiple reasons behind. The smartphone is not only affordable but also comes with a lot of cutting-edge features for its time. Even though it’s a bit older now and has been superseded by newer versions, it still one of the most capable Android smartphones.
Pixel Experiences are usually made from scratch from AOSP with gapps included, and all Pixel stuffs (launcher, wallpapers, icons, fonts, bootanimation). This custom ROM for Moto G 2015 (osprey) is based on stock Android also follows the very clean legacy of this ROM. The latest version of the ROM is based on AOSP which is in turn based on Android Oreo 8.1. This means you will get an almost latest Android experience on a 3-year-old smartphone.
The ROM is provided by XDA Senior Member ZJRDroid, If you are still using Moto G 2015, go ahead and give it a shot!
Known issues
Camcorder not work but working fine with Footage Camera
Pre-requisites:
- Create a proper backup of all your existing data on the phone using a recommended custom recovery TWRP.
- The Moto G 2015 should be rooted with the latest version of a custom recovery like CWM or TWRP installed.
- The bootloader of your osprey must be unlocked.
- Make sure that the battery level of the Moto G is at least above 60%.
Here’s a guide to install the Pixel Experiences Android 8.1 Oreo ROM on your Moto G 2015 (osprey).
- Download Android 8.1 Pixel Experiences custom ROM Moto G 2015.
- Power off the phone and Wait a few seconds and then press the volume up and volume down buttons along with the power button at the same time for about 3, or 4 seconds.Release the buttons.
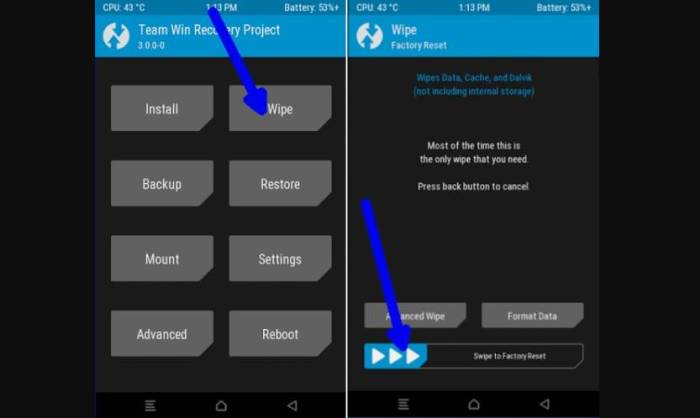
- Once the phone enters into TWRP Recovery, perform a full data wipe task by Select “Wipe” from the main menu of the TWRP recovery and then select “Swipe to factory reset” option on the bottom of the screen.

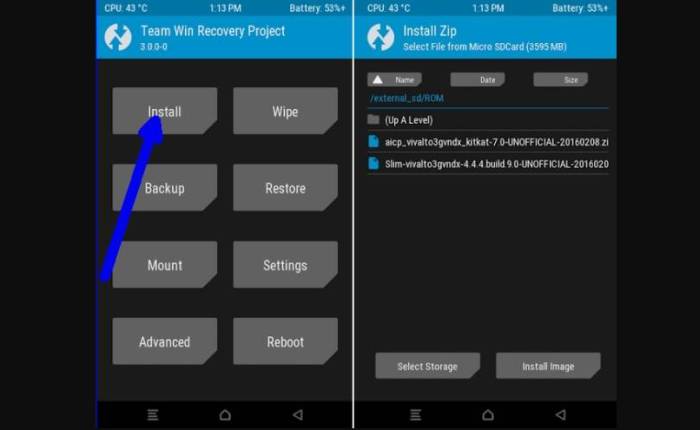
- Return to the main TWRP menu and choose Install. Browse and select the PixelExperience_osprey-8.1.0-20180117-1904-OFFICIAL.zip file which you copied earlier to your phone’s SD card in the second step. Swipe to Install/Flash in order to begin the flashing process.

- Once Pixel Experiance ROM are installed, and then select “Reboot System” button.
Your Moto G Osprey will reboot. After the phone reboots, it will take about 4 to 5 minutes to boot for the first time after installation.
Useful files